Z-Image Outpainting and Object Removal: ComfyUI Editing Workflow
Core philosophy: "Paint" where change is needed, leave the rest untouched.
In AI image generation workflows, Z-Image excels not only at generating images from scratch but also at precise editing of existing images. Whether it's expanding e-commerce product shots, extending backgrounds, removing unwanted objects, or repairing details, Z-Image's Outpainting and Inpainting engine can achieve professional-grade retouching results with minimal effort.
This article systematically covers Z-Image's outpainting and object removal workflows in ComfyUI, from core concepts to practical techniques, helping you more than double your editing efficiency.
1. Why Outpainting Matters
In real-world commercial scenarios, "generating a perfect image" is often just the first step. More often, you need to deal with:
- Product image dimensions don't match platform requirements: The platform requires a 1:1 square, but you only have a 3:4 vertical image
- Composition needs adjustment: The subject is off-center, requiring canvas expansion and recropping
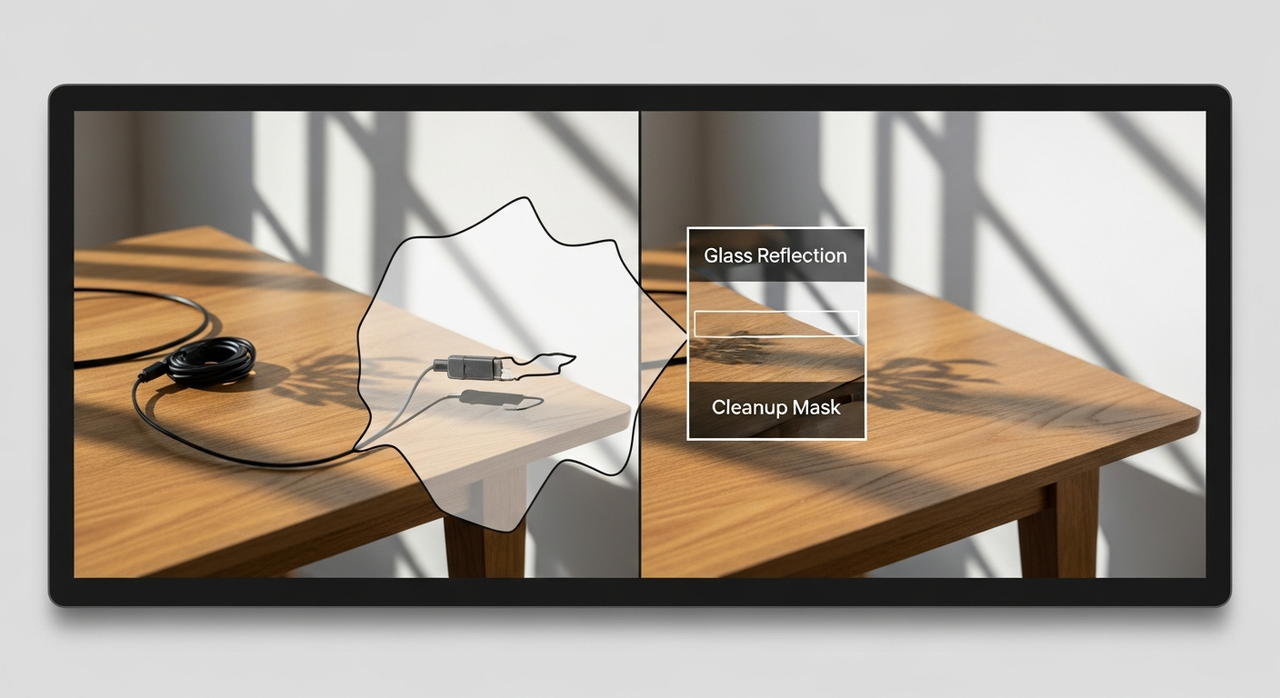
- Unwanted elements in the frame: Power cables, watermarks, and random passersby need seamless removal
- Background isn't "clean" enough: A white background isn't white enough, requiring extension into a seamless white backdrop
Fixing these issues in traditional Photoshop requires skilled operators working on each image individually. With Z-Image's Outpainting/Inpainting engine, combined with proper prompts and masking strategies, you can compress batch editing time for 9 product images from 40 minutes down to 18 minutes.
This is why mastering these editing skills is more important than simply knowing how to "generate."
2. Three Editing Modes Explained
Z-Image's editing capabilities are divided into three modes. Understanding their differences is a prerequisite for efficient workflows.
Inpainting (Local Redraw)
Replaces or modifies specific areas within an existing image. For example:
- Changing clothing color
- Altering facial expressions
- Repairing damaged textures
Outpainting (Canvas Expansion)
Expands the canvas beyond the image boundaries, with AI automatically filling in the extended content. For example:
- Expanding a vertical photo into horizontal format
- Adding more background space to product images
- Generating wider panoramic scenes
Object Removal
A focused variant of Inpainting, specifically designed to remove unwanted objects and intelligently fill in the background. For example:
- Removing power lines from photos
- Clearing people from the background
- Eliminating watermarks and tags
Comparison of the Three Modes
| Feature | Inpainting (Local Redraw) | Outpainting (Canvas Expansion) | Object Removal |
|---|---|---|---|
| Target Area | Inside the image | Outside image boundaries | Inside the image |
| Mask Scope | Large or small, customizable as needed | Usually in edge extension areas | Precisely wraps the object to be removed |
| Prompt Focus | Describe replacement content | Describe extension direction and style | Describe the background to "preserve" |
| Typical Scenarios | Outfit change, face retouching, color change | Canvas expansion, panoramic extension | Line removal, watermark removal, clutter cleanup |
| Iterations | Usually 1–2 | Multiple small steps | Usually 1 pass, 2 for complex objects |
| Mask Precision Requirement | Medium | Low (edge areas) | High (needs precise wrapping) |
3. Outpainting Canvas Expansion: Step-by-Step Workflow
The success rate of Outpainting depends on whether you follow the principle of small steps, clear direction.
Step 1: Determine Target Aspect Ratio
In ComfyUI, first clarify your final desired dimensions.
- E-commerce white background: 1:1 (1024×1024)
- Horizontal banner: 16:9 (1920×1080)
- Vertical social media: 4:5 (1024×1280)
💡 Recommendation: Use the target dimensions as a starting point, and work backward to calculate the pixel expansion needed for each side.
Step 2: Expand One Side at a Time
This is the most critical step. Do not expand all four sides at once—instead, proceed side by side:
- Expand left → Generate → Confirm result
- Expand right on the result → Generate → Confirm result
- Expand top → Generate → Confirm result
- Finally, expand bottom → Generate → Confirm result
Keep each expansion amount within 10%–20% (relative to the current canvas width/height) to avoid the AI generating too much unknown area at once, which can cause style drift.
Step 3: Use Directional Prompts
Provide clear visual guidance for each side's expansion:
Expand left 15%: continue wood floor texture, maintain natural light gradient from left to right.
Expand top 10%: white seamless background, consistent color temperature with existing background, retain continuation of mug bottom shadow at the base.
Step 4: Check Seams and Tone
After each expansion, check:
- Whether the boundary between old and new areas is natural (no hard edges, no color mismatch)
- Whether lighting direction is consistent
- Whether textures are continuous (e.g., wood grain, fabric texture)
If issues are found, reduce the expansion amount and regenerate, rather than attempting additional patching.
4. Object Removal Strategies
The core philosophy of Object Removal is counterintuitive: Don't just tell the AI what to remove—tell it what to preserve.
Strategy 1: Describe the Texture to "Restore"
❌ Wrong approach: Remove power cable
✅ Correct approach: Remove power cable: restore wood grain and keep natural window reflection: lighting from left.
Explicitly naming the type of texture to restore (wood grain, fabric, wall, skin) enables the AI to generate accurately matching fill content.
Strategy 2: Respect Shadow Relationships
If the object to be removed casts a shadow, you need to decide after removal:
- Shadow belongs to the object → Remove it together, restore the occluded background
- Shadow belongs to another object → Preserve the shadow, only remove the object itself
Specify in the prompt: respect existing shadows or remove object and its shadow.
Strategy 3: Use Irregular Masks
Don't use rectangular bounding boxes to select the object to remove. A mask that precisely follows the object's contour significantly reduces the AI's guesswork area and improves fill accuracy.
- The mask should extend slightly beyond the object edge (1–2px), including a small amount of contextual information
- Avoid masks hugging high-contrast edges, as this can result in harsh blending
Strategy 4: Remove Complex Objects in Steps
For structurally complex objects (e.g., people, animals), you can:
- First pass: remove the main body
- Second pass: fix remaining shadows or background imperfections
5. Masking Best Practices
Mask quality directly determines editing results—its importance is no less than that of prompts.
Brush Softness Matters More Than Size
⚠️ This is the most common misconception. Many people spend time adjusting mask size while neglecting brush softness (Feather).
Recommended settings:
- Feather: 3–8px (adjust based on image resolution)
- Low-resolution images (≤512px): 3–5px
- High-resolution images (1024px+): 5–8px
Proper feathering gives the mask edge a natural transition zone, allowing the AI to perform gradient blending within this area and avoid hard edges or color patches.
Five Golden Rules
| Rule | Description |
|---|---|
| Work at output resolution | Don't draw masks on thumbnails. Always operate at final output resolution to ensure precision |
| Avoid high-contrast edges | If the mask edge crosses an area of strong light-dark contrast (e.g., the boundary between a white wall and dark furniture), adjust the mask position so the transition zone falls within the same texture region |
| Include a 1–2px context slice | The mask should slightly exceed the target area, including a few surrounding pixels as style reference for the AI |
| Save masks for reuse | When processing in batches, save commonly used masks as PNG grayscale images and load them directly later, avoiding repeated drawing |
| Brush softness takes priority over size | Adjust softness first, then size. If softness is insufficient, enlarging the brush won't fix it |
6. Prompt Engineering for Editing Scenarios
Prompts in Z-Image's editing mode differ fundamentally from those in generation mode.
Core Principle: One Sentence, Clear Constraints
Editing prompts don't need elegant rhetoric—they need precise instructions. Recommended format:
[Action target] : [What to restore/preserve] : [Environmental constraints]
Practical Prompt Templates
Object Removal
Remove power cable: restore wood grain and keep natural window reflection: lighting from left.
Background Extension
Extend white seamless background 15% on the right: match gradient and soft shadow under mug.
Chinese Prompts
Remove power lines on the right: restore white wall texture, preserve natural light spots on the wall, lighting from upper left.
Extend white seamless background 15% to the right: match background gradient transition, preserve soft shadow beneath the mug.
Fixing Plastic-Look Results
AI-generated fill areas can sometimes appear overly smooth, resulting in a "plastic look." Appending the following phrases at the end of your prompt can effectively mitigate this:
retain subtle imperfectionsslight surface irregularities
For Chinese prompts: preserve natural texture details, do not over-smooth
Prompt Pitfall Checklist
| Problem | Cause | Fix |
|---|---|---|
| Fill content doesn't match style | Missing style constraints | Append match surrounding style and color temperature |
| Area too smooth | Missing texture constraints | Append retain subtle imperfections |
| Color shift | Missing color temperature constraints | Append match color temperature of original image |
| Extra objects generated | Prompt too broad | Narrow the description scope, focus on the texture to restore |
7. Common Issues and Troubleshooting
| Problem | Cause | Solution |
|---|---|---|
| Edge halo (Halo) | Brush hardness too high, mask edge too sharp | Reduce brush hardness, increase Feather to 5–8px |
| Blurred/smeared texture | Mask area too large, AI fill exceeds texture repeat cycle | Reduce mask area, process in multiple small areas |
| Repeating patterns/mirroring | Single expansion too large, AI duplicates existing texture | Reduce per-step expansion pixel amount (≤15%), proceed in steps |
| Color shift/white balance mismatch | Color temperature mismatch between old and new areas | Append match color temperature in prompt, or manually fine-tune output white balance |
| Object remnants/incomplete removal | Mask doesn't fully cover the target object | Expand mask area, ensure the entire object is within the mask |
| Background incorrectly modified | Mask area exceeds target region | Shrink the mask, precisely fit the target object contour |
| Visible seams | Expansion too large or insufficient directional guidance | Reduce expansion amount, add directional descriptive terms |
8. Practical Case Studies
Case 1: Expanding E-commerce Product Image to Square
Scenario: A 3:4 vertical product photo (800×1067) needs to be expanded to 1:1 (1067×1067) for an e-commerce platform.
Steps:
- Calculate expansion amount: left side needs (1067–800)/2 ≈ 134px (~17%)
- Expand left:
- Mask: left 150px area, Feather 5px
- Prompt:
Extend white seamless background on the left: match gradient and soft shadow under product.
- Expand right:
- Mask: right 150px area, Feather 5px
- Prompt:
Extend white seamless background on the right: match gradient and soft shadow under product.
- Check seams, confirm consistent tone.
Time: ~2 minutes/image (including generation time)
Case 2: Removing Power Cable from Product Photo
Scenario: A white-background product image with a black power cable visible behind the product, needing seamless removal.
Steps:
- Precisely trace the power cable mask (fitting the cable contour, with 2px outward expansion)
- Set Feather to 4px
- Prompt:
Remove black power cable: restore white seamless background, maintain shadow consistency: lighting from above. - After generation, check the cable area and confirm natural background texture.
Time: ~1 minute/image
Case 3: Batch Editing Efficiency Comparison
Scenario: 9 product photos, each requiring background clutter removal + expansion to square.
| Method | Time | Result Consistency |
|---|---|---|
| Photoshop manual retouching | ~40 minutes | Depends on operator skill level |
| Z-Image semi-automated workflow | ~18 minutes | High (templated prompts) |
| Z-Image + mask reuse | ~12 minutes | Highest |
💡 Efficiency tip: Save commonly used masks as templates, pair with fixed prompts, and build a reusable "retouching recipe."
Summary
Z-Image's Outpainting and Object Removal features essentially automate the most time-consuming "retouching" phase of traditional image editing. Mastering the following key points can significantly improve your editing quality:
- Small-step expansion: Expand 10–15% per step, proceed side by side, avoid one-step completion
- Precise masking: Feather 3–8px is the golden range; softness matters more than size
- Clear prompts: One sentence that says what to do, what to restore, and the environment
- Tell the AI what to preserve: More important than describing what to remove
- Prevent plastic look: Append
retain subtle imperfections
These techniques are applicable not only to Z-Image workflows in ComfyUI, but their core philosophy—precise mask + clear instruction + small-step iteration—also applies to other AI image editing tools.
📌 Coming up next: Z-Image ControlNet Precise Image Control: A Complete Workflow from Line Art to Photorealistic Rendering
This article is based on Z-Image v2.0 tested in ComfyUI 1.6+. Different versions may have node differences—please refer to your actual version.