Z-Image ControlNet Pose/Depth/Canny Guide
Master three core structural control modes to make AI image generation follow your compositional intent while preserving the model's native style.
1. Introduction: How ControlNet Separates "Style" from "Structure"
In AI image generation, one eternal challenge is: How do you make the model obey your composition without losing its own style?
ControlNet's answer is elegantly simple—leave style to the prompt, leave structure to the control signal.
ControlNet guides the AI's generation direction through additional conditional inputs (structural hints), while preserving the model's native style. This means you can use a reference image to control the composition, perspective, and pose of the output, while the final artistic style is still determined by your Prompt and base model.
In a Z-Image (ComfyUI) workflow, this capability is implemented through the QwenImageDiffsynthControlnet node, paired with an ImpactSwitch node to freely switch between different control modes.
2. Three Control Modes Explained
ControlNet provides multiple preprocessors, each extracting different structural information suited to different use cases. This article focuses on the three most common and practical ones:
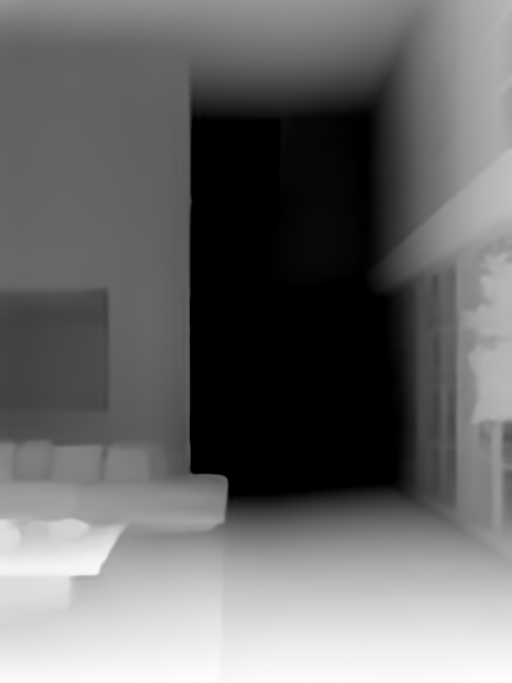
Depth Estimation (Depth)
The Depth preprocessor estimates per-pixel 3D distance information from a single input image, producing a grayscale depth map—brighter for closer areas, darker for farther ones.
What does it preserve?
- Camera distance (depth-of-field relationships)
- Outlines and mass volumes of large objects
- Perspective relationships from the source image, including "awkward" angles
What does it ignore?
- Colors, textures, material details
- Specific human poses (unless the pose affects the overall silhouette)
Typical behavior: Perspective distortions in the source image are preserved—this is exactly Depth's characteristic. It faithfully transmits spatial structure without aesthetic correction.
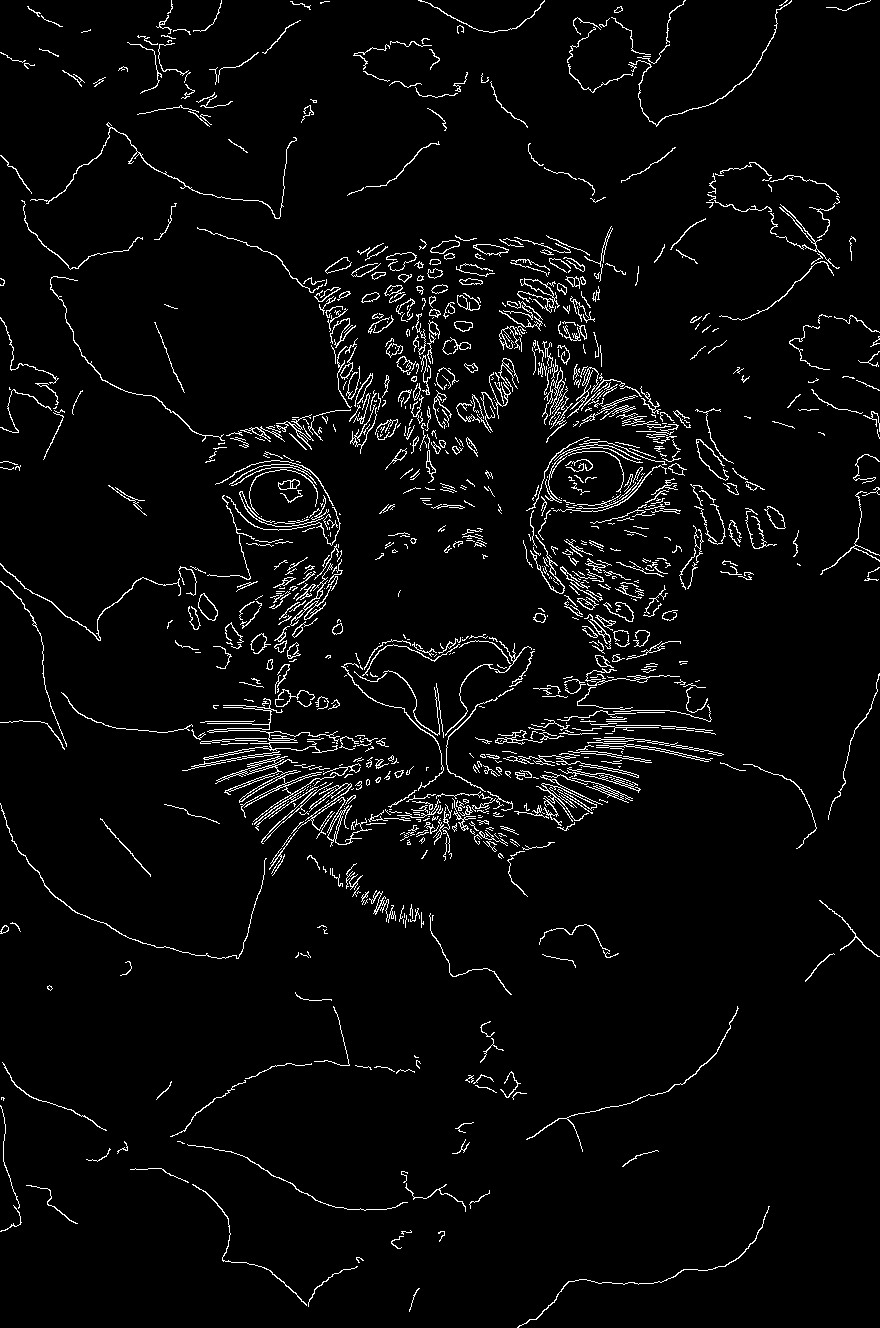
Edge Detection (Canny)
The Canny preprocessor extracts clean, sharp contour lines from the image, completely ignoring internal textures.
What does it preserve?
- Outer contours and internal structural lines of objects
- Line directions and intersections
What does it ignore?
- Colors, tonal gradients, materials
- Depth information and spatial hierarchy
Key characteristic: Canny is highly reliable for line-art control at moderate intensity, but becomes brittle at high intensity—lines become too rigid, the model is "forced" to conform to every line, resulting in a stiff, artifact-prone image.
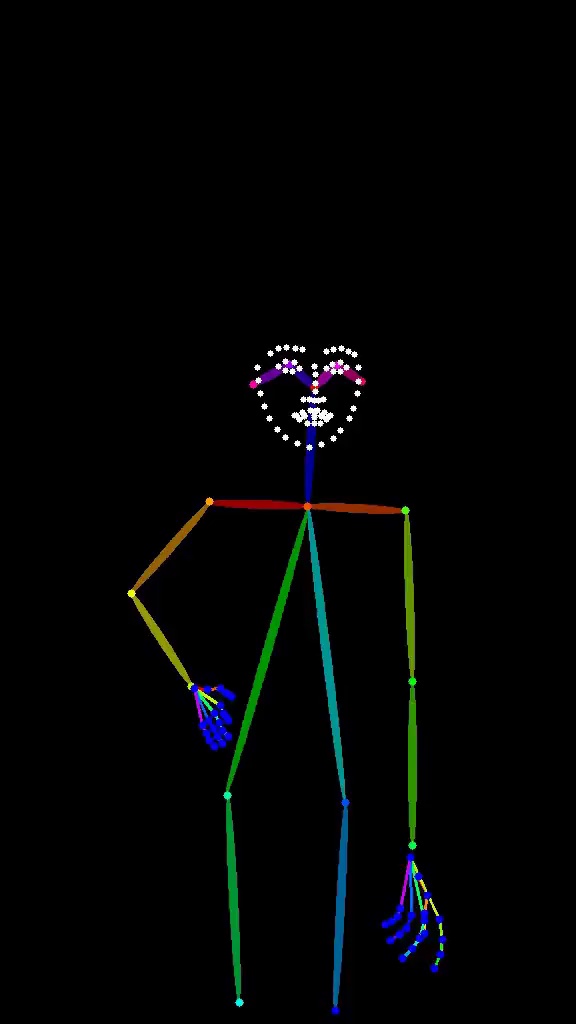
Pose Estimation (Pose)
The Pose preprocessor maps the human body into joint points and bone connections (OpenPose format), marking key skeletal structures with colored lines.
What does it preserve?
- The overall rhythm of the human body (body cadence)
- Limb positions and angles
- Relative relationships between joints
What does it ignore?
- Facial likeness (it won't guarantee the face "looks like someone")
- Clothing folds and details
- Non-human object structures
Key takeaway: Pose controls "the rhythm of the body in space," not "what it specifically looks like." It's excellent for character pose design, but don't expect it to solve facial similarity problems.
Comparison Summary Table
| Feature | Depth | Canny | Pose |
|---|---|---|---|
| Extracted Information | 3D distance/spatial structure | Contour lines | Human body joints & skeleton |
| Best For | Architecture, scene perspective | Line-art conversion, sketch refinement | Character pose design |
| Preserves Perspective? | ✅ Faithfully | ❌ Doesn't care | ❌ Only preserves body proportions |
| Ignores Texture? | ✅ | ✅ | ✅ (focuses on human body only) |
| High-Strength Risk | Over-fixed spatial feel | Rigid lines, brittle output | Overly rigid, unnatural poses |
| Recommended Starting Strength | 0.5–0.6 | 0.4–0.6 | 0.5–0.7 |
| Works on Non-Human Objects? | ✅ | ✅ | ❌ |
3. When to Use Which Mode?
When to Choose Depth
- Architecture/interior design visualization: Preserve spatial perspective and object proportion relationships
- Scene reconstruction: Generate different-style renders from the same camera angle as a photograph
- Product rendering: Maintain depth relationships between product and environment
- When perspective correction is not needed (Depth preserves source image perspective, including suboptimal angles)
When to Choose Canny
- Line-art coloring/style transfer: Turn hand-drawn sketches into finished pieces
- Precise structural replication: Scenes requiring strict adherence to contour lines
- Icon/LOGO generation: Precise edge control needed
- Converting simple sketches into refined output
When to Choose Pose
- Character concept design: Lock a character pose and experiment with different styles/outfits
- Fan art creation: Use a reference pose to generate the same action for different characters
- Dynamic pose design: Explore multiple variations of a character's movement
- Multi-character scene composition: Control positioning and actions of multiple characters
Decision Flowchart
What do you need to control?
├── Spatial structure/perspective → Depth
├── Contour lines/sketches → Canny
└── Character poses/actions → Pose

Need to control multiple dimensions at once?
└── Combine modes (see Section 7)
4. Depth Workflow (Step-by-Step Guide)
Node Connections
[LoadImage] → Reference image input
     ↓
[ControlNet Preprocessor: Depth] → Generate depth map
     ↓
[QwenImageDiffsynthControlnet]
├── Input: Depth map
├── strength: 0.5 (starting value)
└── Output: conditioning
     ↓
[VAEEncode] ← Prompt (style description)
     ↓
[KSampler]
├── positive: conditioning (from ControlNet)
├── negative: Negative prompt
└── model: Base model
     ↓
[VAEDecode] → [SaveImage]
Key Parameters
| Parameter | Recommended Value | Notes |
|---|---|---|
| strength | 0.5 | Starting value, adjust as needed |
| start_step | 0.0 | Engage from the start of sampling |
| end_step | 0.8 | Exit in late sampling to preserve model freedom |
| preprocessor | Depth | MiDaS or ZoeDepth |
Example
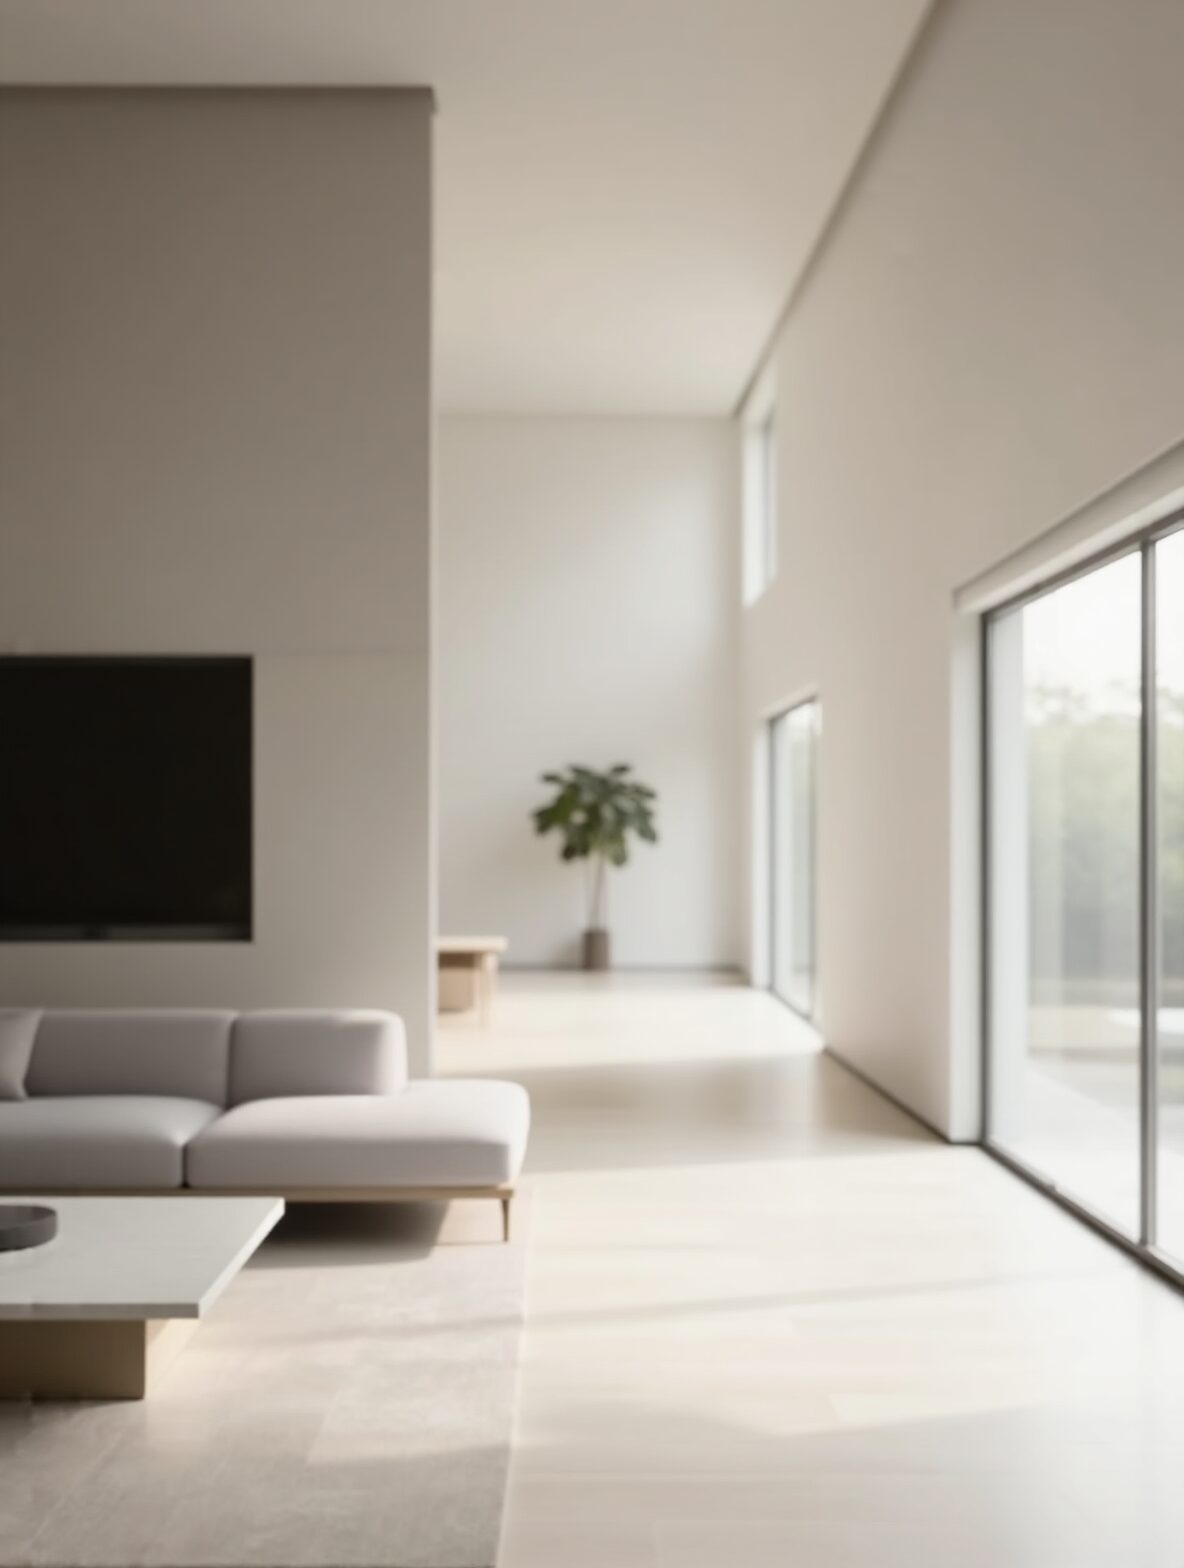
Input: An interior room photograph
Prompt: cinematic lighting, modern interior design, warm tones, photorealistic, 8k
Strength: 0.55
Result: The output preserves the original room's spatial layout and perspective, but materials, lighting, and style are fully driven by the Prompt, producing a cinematic-quality interior render.
Tuning tips:
- Raising strength from 0.55 to 0.7 tightens spatial constraints but reduces the model's stylistic freedom
- Shortening end_step from 0.8 to 0.6 gives the model more late-stage freedom, making the style more pronounced
5. Canny Workflow (Step-by-Step Guide)
Node Connections
[LoadImage] → Reference image / line-art input
     ↓
[ControlNet Preprocessor: Canny]
├── low_threshold: 100
└── high_threshold: 200
     ↓
[QwenImageDiffsynthControlnet]
├── Input: Canny edge map
├── strength: 0.5 (starting value)
└── Output: conditioning
     ↓
[KSampler] → [VAEDecode] → [SaveImage]
Canny Threshold Parameters
| Parameter Combination | Effect | Use Case |
|---|---|---|
| low: 100, high: 200 | Standard edge extraction | General purpose |
| low: 50, high: 100 | More detailed lines | Fine sketches |
| low: 150, high: 250 | Only coarse outlines retained | Simplified line-art |
Example
Input: Simple hand-drawn character sketch
Prompt: masterpiece, best quality, anime style, detailed character, dynamic pose
Strength: 0.45
Canny Thresholds: low 100, high 200
Result: The sketch's outlines are faithfully preserved, while the AI fills in refined anime-style details within the contours—hair strands, clothing textures, lighting effects.
Tuning tips:
- At strength = 0.4, the model has considerable creative freedom—ideal for sketch conversion
- At strength > 0.7, line constraints are too tight, causing facial stiffness
- For complex line-art, appropriately lower high_threshold to reduce noise-line interference

Multi-Mode Switching
Use an ImpactSwitch node to connect the same ControlNet node to multiple preprocessor outputs, dynamically switching via a single switch value:
[Depth Preprocessor] ─┐
[Canny Preprocessor]  ├→ [ImpactSwitch] → [QwenImageDiffsynthControlnet]
[Pose Preprocessor]   ┘
Switch Index = 0 → Depth, = 1 → Canny, = 2 → Pose
This allows switching control modes without rewiring, significantly simplifying the workflow.
6. Pose Workflow (Step-by-Step Guide)
Node Connections
[LoadImage] → Reference image (containing a person)
     ↓
[ControlNet Preprocessor: OpenPose]
├── Detect human joints
└── Output: Colored pose map
     ↓
[QwenImageDiffsynthControlnet]
├── Input: Pose map
├── strength: 0.6 (starting value)
└── Output: conditioning
     ↓
[KSampler] → [VAEDecode] → [SaveImage]
Example
Input: A photograph of an athlete running
Prompt: cyberpunk character, neon city background, dynamic running pose, futuristic outfit
Strength: 0.6
Result: The output character's running pose closely matches the reference, but the character's appearance is fully transformed into a cyberpunk style—completely different clothing, color scheme, and background.
Tuning tips:
- strength = 0.5: Loose pose constraints, suitable for exploring pose variations
- strength = 0.6–0.7: Standard range, high pose fidelity while remaining natural
- strength > 0.8: Poses become too "stiff," the character looks frozen and unnatural

Pose Limitations
- No face control: Pose only tracks body skeleton, not facial features. For facial control, pair with an IP-Adapter or Facial Restoration node
- Ineffective on non-human objects: Pose has no effect on buildings, products, animals, etc.
- Multi-person scenes: OpenPose can detect multiple people, but joints may cross and overlap. For complex multi-person scenes, consider manually cleaning up the pose map
7. Combined Workflows
Combination 1: Pose + Inpaint (Local Redraw)
One of the most practical combinations for character creation.
Scenario: You have a satisfying full-body character pose but need to adjust the face or clothing.
[LoadImage] → [IP-Adapter / Face Restore] → Facial control
     ↓
[OpenPose Preprocessor] → Pose control
     ↓
[QwenImageDiffsynthControlnet] (Pose, strength 0.6)
     ↓
[KSampler] with [LatentMask] → Local sampling
     ↓
[VAEDecode] → [SaveImage]
Workflow steps:
- Use Pose ControlNet to lock the overall pose (strength 0.6)
- Generate the complete character image
- Draw a mask on the face area
- Inpaint the masked region to adjust facial features or expression
- Pose control ensures the repainted face remains coordinated with the body pose
Combination 2: Multiple ControlNets in Parallel
Z-Image supports using multiple ControlNet nodes simultaneously, stacking different structural constraints.
[Depth Preprocessor] → [QwenImageDiffsynthControlnet] (strength 0.4)
[Canny Preprocessor]  → [QwenImageDiffsynthControlnet] (strength 0.3)
     ↓                    ↓
[Concat Conditioning] → [KSampler]
Stacking principles:
- Set each ControlNet's strength individually; total should not be too high
- Recommended total strength ceiling: 1.0 (exceeding this removes model freedom)
- Depth + Canny is a classic combination: Depth controls spatial structure, Canny controls contour lines
Typical combinations:
| Combination | Scenario | Recommended Strength Allocation |
|---|---|---|
| Depth + Canny | Architecture/product visualization | Depth 0.4, Canny 0.3 |
| Pose + Depth | Character in complex scene | Pose 0.5, Depth 0.3 |
| Pose + Canny | Character line-art coloring | Pose 0.4, Canny 0.4 |
Combination 3: ControlNet + IP-Adapter
ControlNet handles structure, IP-Adapter handles style/face—they complement each other:
[Reference Image A - Structure] → [ControlNet Preprocessor] → [ControlNet Node]
[Reference Image B - Style/Face] → [IP-Adapter] → [Conditioning]
     ↓                              ↓
[Concat] → [KSampler]
This lets you use one image to control composition and another to control style or facial features.
8. Strength Tuning Guide and Advanced Techniques
Strength Reference Table
| Strength | Effect Description | Use Case |
|---|---|---|
| 0.2–0.3 | Slight guidance | Just a hint of structural suggestion needed |
| 0.4 | Loose control | Sketch conversion, retain significant stylistic freedom |
| 0.5–0.6 | Baseline recommendation | Starting point for most scenarios |
| 0.7 | Strong control | Higher structural fidelity needed |
| 0.8 | Precise lock | Strict adherence to reference structure required |
| 0.9–1.0 | Extreme constraint | Highly prone to stiffness/artifacts, use with caution |
Tuning Workflow
Step 1: Start with strength = 0.5
Step 2: Generate 2-4 images, observe the balance between structural fidelity and stylistic freedom
Step 3: If structure is insufficient → increase by +0.1 each time
Step 4: If style is suppressed → decrease by -0.1 each time
Step 5: Once balanced, fine-tune start_step and end_step
Advanced Techniques
1. Phased Control (start_step / end_step)
ControlNet doesn't need to participate throughout the entire sampling process. By controlling its active time window, you can achieve finer-grained results:
start_step = 0.0, end_step = 0.6
→ ControlNet guides structure during the first 60% of sampling, the model goes free for the remaining 40%

start_step = 0.2, end_step = 0.8
→ Skip the first 20% (let the model establish a general direction first), engage in the middle phase
Rule of thumb:
- Want more model freedom → Shorten end_step
- Want more precise structure → Extend end_step, but don't exceed 0.9
- Want the model to "think first" → Delay start_step to 0.1–0.2
2. Post-Processing Preprocessed Outputs
The structural maps produced by preprocessing (depth maps, edge maps, pose maps) can be manually edited before feeding them into ControlNet:
- Depth map: Adjust local depth values with a grayscale editor to fix inaccurate areas
- Canny map: Manually erase unwanted lines or supplement missing contours
- Pose map: Use an OpenPose Editor to adjust joint positions and create poses not present in the reference image
3. Multi-Scale Processing
Preprocessing results vary depending on input resolution:
- Small images (< 512px): Reduced preprocessing accuracy—consider upsampling before preprocessing
- Large images (> 1024px): Higher accuracy but heavier computation—watch your VRAM
- Best practice: Preprocess at around 1024px, then feed into ControlNet
4. Common Troubleshooting
| Problem | Possible Cause | Solution |
|---|---|---|
| Output unrelated to reference | strength too low / wrong preprocessor | Raise strength to 0.6, verify preprocessor choice |
| Stiff image, lost detail | strength too high | Lower to 0.5–0.6, shorten end_step |
| Noisy Canny output | Threshold settings off | Raise high_threshold |
| Pose can't detect person | Person too small / occluded | Crop the reference, ensure person occupies the main area |
| Depth perspective inaccurate | Source image perspective unclear | Use a clearer reference image |
| Combined ControlNets conflict | Total strength too high | Lower individual strengths, keep total under 1.0 |
5. Save and Reuse
- Record your tuned strength, start_step, and end_step parameters
- In Z-Image, save the entire workflow as a template (.png workflow)
- Pre-configure multiple modes with ImpactSwitch for one-click switching
Summary
ControlNet is one of the most powerful structural control tools in AI image generation. Mastering the three core modes—Depth, Canny, and Pose—gives you:
- Depth — An anchor for space, letting the AI "see" 3D structure
- Canny — A skeleton of lines, letting the AI "follow" contours to create
- Pose — A rhythm of movement, letting the AI "understand" human motion
Remember the core principle:
Prompt determines style, ControlNet determines structure, and Strength determines the balance between the two.
Start at strength = 0.5, adjust gradually, and find the optimal balance for each scenario. With growing experience, you'll be able to precisely control every detail of AI-generated images while preserving the model's native artistic style.
This article is written for the Z-Image (ComfyUI) environment, with QwenImageDiffsynthControlnet and ImpactSwitch as core nodes. Parameter names may vary slightly across plugin versions—refer to the actual node panels for accuracy.