ComfyUI Practical Guide: A Hands-on Walkthrough for ERNIE-Image!
Recently, the new open-source text-to-image model ERNIE-Image officially made its debut. Built on an 8B-parameter DiT architecture, it stands out in complex instruction following, text rendering, and structured image generation. It supports a wide range of visual styles, from realistic photography and design-oriented imagery to stylized expression, making it especially suitable for content production scenarios that require strong control, such as posters, comics, and multi-panel layouts.
ERNIE-Image Open-Source SOTA! Top-tier Rendering and Dense Text Drawing on Consumer GPUs
- ERNIE-Image - SFT model: stronger general capabilities and better instruction fidelity, with 50 inference steps
- ERNIE-Image-Turbo - fast model: optimized through DMD and RL, achieving higher speed and better aesthetic quality in only 8 steps
Today, we bring you a beginner-friendly ComfyUI hands-on tutorial that walks you through ERNIE-Image deployment and usage step by step. Even if you're new to it, you can get started quickly.
ComfyUI-related repositories
- ModelScope: https://modelscope.cn/models/Comfy-Org/ERNIE-Image/
- Hugging Face: https://huggingface.co/Comfy-Org/ERNIE-Image
- Comfy Cloud: https://links.comfy.org/4cse938
- Workflow download: https://github.com/Comfy-Org/workflow_templates/blob/main/templates/image_ernie_image.json
Installing ComfyUI and downloading weights
1.1 Web installation
For the web version, you need to pull the latest ComfyUI repository and set up the required Python environment.
### Clone the latest ComfyUI repository:
git clone https://github.com/Comfy-Org/ComfyUI.git
### Set up the ComfyUI environment and install the latest template package that includes ERNIE-Image:
cd ComfyUI && pip install -r requirements.txt && pip install comfyui-workflow-templates==0.9.56
1.2 Desktop client installation
Download the latest version of ComfyUI, v0.19.1:
https://www.comfy.org/zh-cn/download
1.3 Model weight download
To run ERNIE-Image-Turbo smoothly on a server or local machine, you need to configure four core components correctly in ComfyUI: the diffusion model, text encoder, Prompt Enhancer, and variational autoencoder (VAE). Download the core ERNIE-Image model weights from Hugging Face here:
https://huggingface.co/Comfy-Org/ERNIE-Image
Place the model weights into the corresponding ComfyUI directories:
- Diffusion Model
- Files:
ernie-image.safetensors/ernie-image-turbo.safetensors - Path:
ComfyUI/models/diffusion_models/
- Files:
- Text Encoder
- File:
ministral-3-3b.safetensors - Path:
ComfyUI/models/text_encoders/
- File:
- Prompt Enhancer
- File:
ernie-image-prompt-enhancer.safetensors - Path:
ComfyUI/models/text_encoders/
- File:
- Variational Autoencoder (VAE)
- File:
flux2-vae.safetensors - Path:
ComfyUI/models/vae/
- File:
Once these four files are placed in the proper ComfyUI directories, you can start working with the ERNIE-Image workflow in ComfyUI.

Standard workflow
The latest version of ComfyUI now supports the standard ERNIE-Image workflow out of the box, so users can directly use the official recommended workflow to achieve the best image quality and speed.
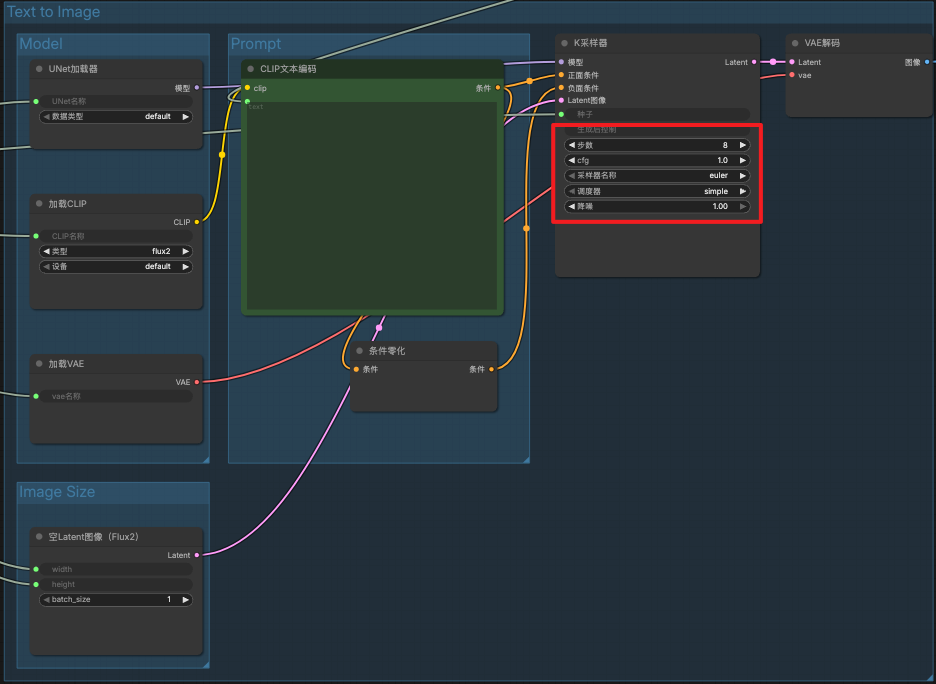
2.1 Loading the model nodes
In ComfyUI, select either “Ernie Image Turbo: Text to Image” or “Ernie Image: Text to Image” from the template library on the left. The system will automatically load the core components that have already been placed in the corresponding directories.

If the files mentioned above have been placed in the correct locations, the related models will load automatically. No manual configuration is required. Just enter a prompt and start generating.
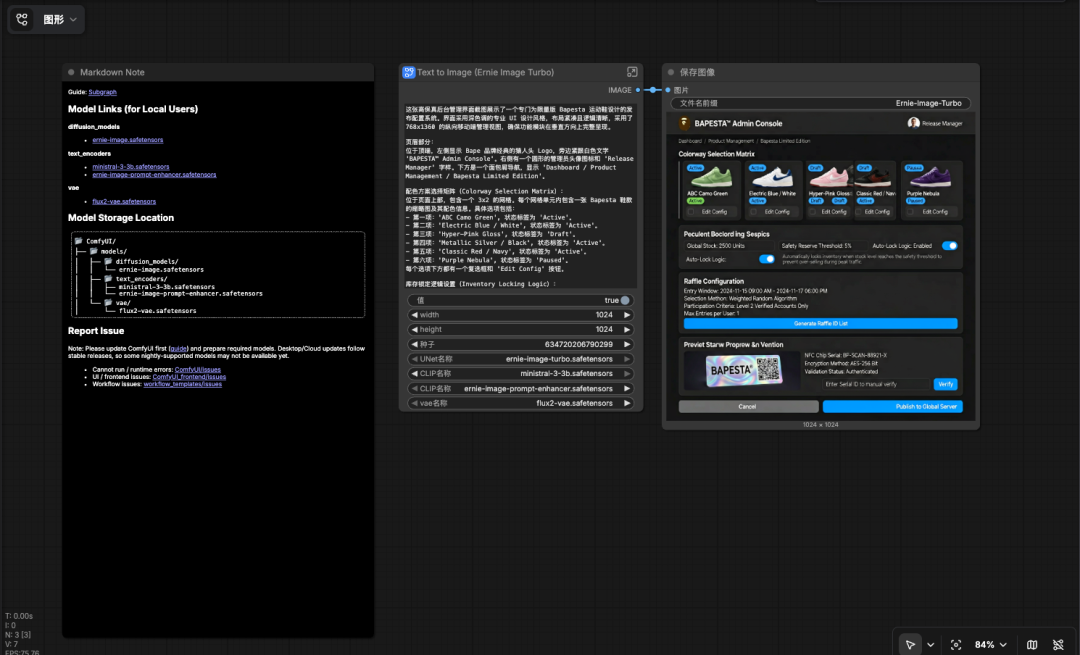
One important detail to note is that the current PE node, as the default option for ERNIE-Image, uses CLIPLoader for both its loader and the Text Encoder loader when loading model weights.
- Weight file loaded by the Text Encoder node:
ministral-3-3b.safetensorsorernie-image-prompt-enhancer.safetensors - Weight file loaded by the Prompt Enhancer node:
ernie-image-prompt-enhancer.safetensors
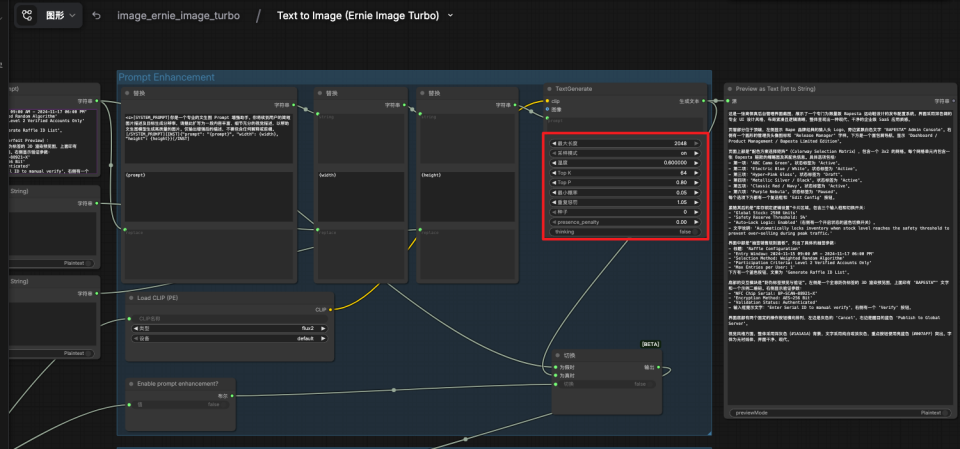
2.2 PE settings
ERNIE Image works best with long, detailed, and well-structured prompts. Richer descriptions often produce better generation quality, more accurate instructional fidelity, and more faithful rendering of complex layouts or narrative content. In practice, it is strongly recommended to enable PE, and the official node enables PE by default.
The PE node parameters can be configured in more detail by clicking the upper-right corner of the node graph to open the subgraph. Recommended key settings are as follows:
- Maximum length (
max_length): set to 1536–2048. If it is too small, long text input may lose information, but setting it too high is also not recommended. - Sampling mode: enabled.
- Temperature (
temperature): set to 0.6. top_p: set to 0.8.thinking mode: disabled.
2.3 Sampler settings
After opening the subgraph, you can also see the sampler-related configuration items. Recommended settings are as follows:
- Steps (
steps): 8 for ERNIE-Image-Turbo, 50 for ERNIE-Image. - CFG guidance scale: 1.0 for ERNIE-Image-Turbo, 4.0 for ERNIE-Image.
- Sampler:
euleris recommended. - Scheduler:
sgm_uniformor the defaultsimpleis recommended.
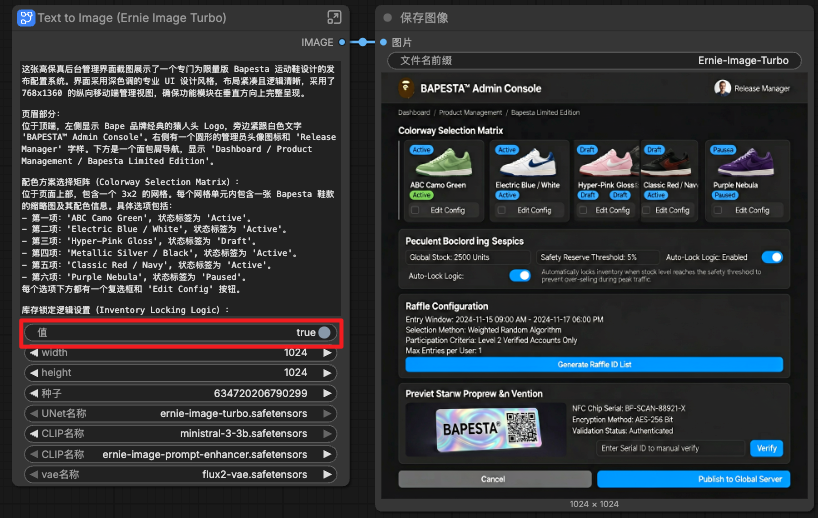
2.4 Resolution settings
ERNIE-Image / ERNIE-Image-Turbo performs best at the following resolutions. For now, avoid generating directly at 2K+ resolutions.
- 1024x1024
- 848x1264
- 1264x848
- 768x1376
- 896x1200
- 1376x768
- 1200x896
GGUF quantized workflow
If you are using low-VRAM hardware, you will need to use the GGUF quantization approach provided by Unsloth. The Unsloth GGUF quantized weights can be downloaded from Hugging Face.

GGUF (Unsloth) related repositories:
- ERNIE-Image GGUF (diffusion model):
https://huggingface.co/unsloth/ERNIE-Image-GGUF - ERNIE-Image-Turbo GGUF (diffusion model):
https://huggingface.co/unsloth/ERNIE-Image-Turbo-GGUF - Text Encoder GGUF:
https://huggingface.co/unsloth/Ministral-3-3B-Instruct-2512-GGUF
First, you need to install the ComfyUI-GGUF plugin in ComfyUI via ComfyUI Manager.
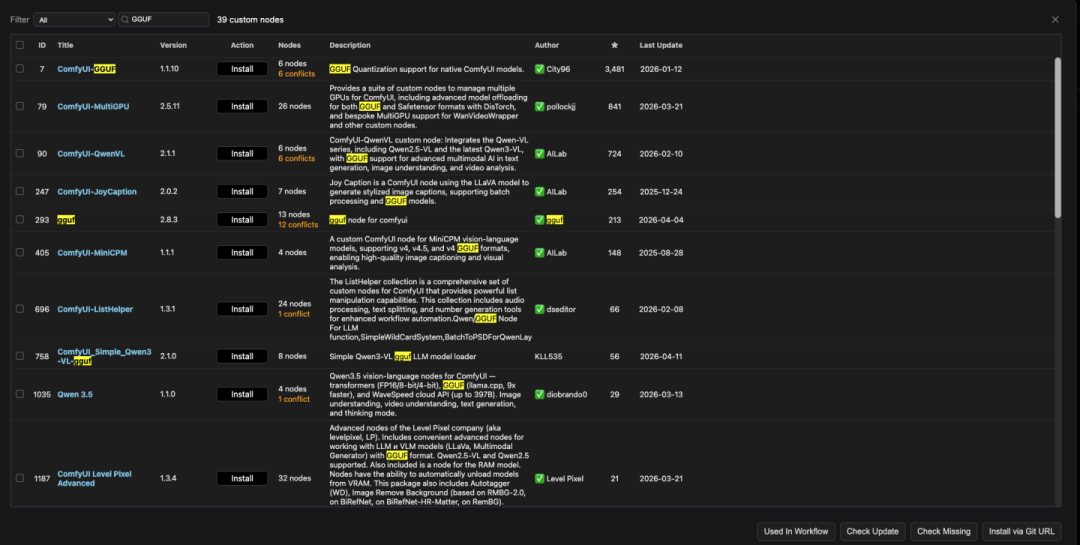
After installation, restart the service and refresh the page. Download the required quantized models from the pages above and place them into the ComfyUI/models/unet/ folder. Then double-click on an empty area, search for GGUF, and click Unet Loader(GGUF) to use the local quantized model. Use the CLIP Loader(GGUF) node to load the text encoder.
Note: a GGUF version of Prompt Enhancer is not currently available.
Showcase examples
Sticker pack
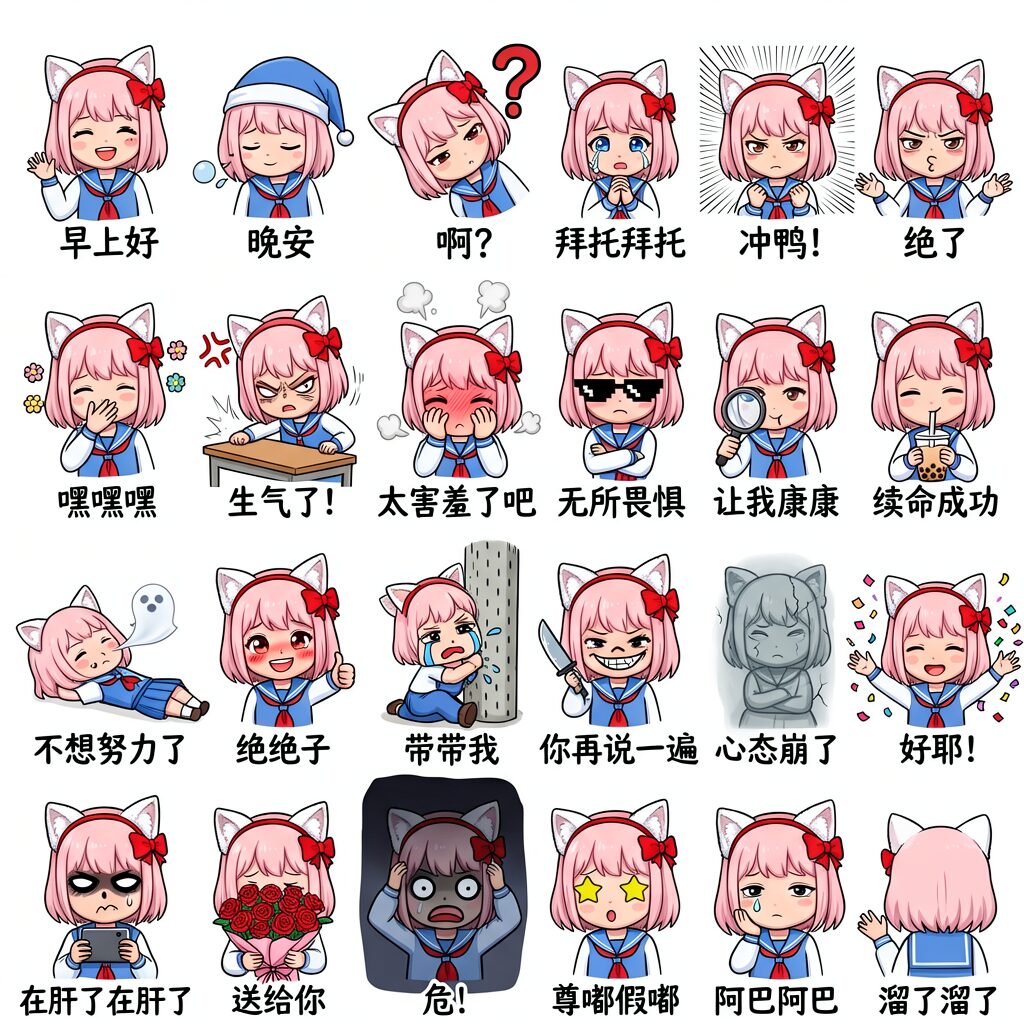
A colorful hand-drawn anime-style chibi LINE sticker collection image. The composition uses a 4-row by 6-column grid layout, displaying 24 half-body stickers in total. The overall style is cute Japanese chibi, with clean rounded lines, bright colors, and a pure white background. Every sticker features the same anime girl protagonist, who has light pink short hair with straight bangs and a signature head accessory: a pair of fluffy white cat ears and a prominent red cross bow headband. She wears a simple blue-and-white sailor uniform. Each sticker is paired with handwritten simplified Chinese text, outlined in white or set on a dark background for clarity.
From left to right, the first row shows: 1. The girl smiling and waving with her right hand, captioned “Good morning.” 2. The girl wearing a sleeping cap with her eyes closed, a sleep bubble rising from her nose, captioned “Good night.” 3. The girl tilting her head with a giant red question mark above her, captioned “Huh?” 4. The girl clasping her hands together, teary-eyed, looking forward, captioned “Please, please.” 5. The girl clenching both fists with a determined look and focus lines in the background, captioned “Let’s go!” 6. The girl spreading both hands helplessly and sighing, captioned “Unbelievable.”
From left to right, the second row shows: 1. The girl covering her mouth with one hand while giggling, with small flower effects around her, captioned “Hehehe.” 2. The girl angrily slamming the table in front of her, with an anger symbol above her head, captioned “I’m mad!” 3. The girl blushing, covering her face with both hands, steam rising above her head, captioned “So embarrassing.” 4. The girl wearing black pixel-style sunglasses with arms crossed, captioned “Fearless.” 5. The girl holding a magnifying glass up close to inspect something, captioned “Let me take a look.” 6. The girl holding a cup of bubble tea with both hands and sipping through a straw with a satisfied expression, captioned “Life restored.”
From left to right, the third row shows: 1. The girl lying flat on the ground with a translucent white soul leaving her mouth, captioned “I don’t want to work anymore.” 2. The girl smiling brightly and giving a thumbs-up, captioned “Awesome.” 3. The girl sitting on the ground hugging a dashed pillar and crying hard, tears splashing out, captioned “Take me with you.” 4. The girl holding a toy plastic knife with a dark smirk on her face, captioned “Say that again.” 5. The girl turned into a gray stone statue with cracks across her body, captioned “Mental breakdown.” 6. The girl happily tossing confetti and flower petals into the air, captioned “Yay!”
From left to right, the fourth row shows: 1. The girl typing frantically on her phone with both hands, sweating heavily and with dark circles under her eyes, captioned “Still grinding.” 2. The girl offering a large bouquet of red roses with both hands, cheeks slightly flushed, captioned “For you.” 3. The girl in panic with both hands clutching her head, pupils shrunk, the background darkened, captioned “Danger!” 4. The girl with yellow star-shaped eyes full of anticipation, captioned “Really?” 5. The girl resting her chin on one hand with a blank stare and a drop of drool at the corner of her mouth, captioned “Uh... uh...” 6. The girl waving goodbye with her back turned, glancing back with a tear on her face, captioned “I’m off.”
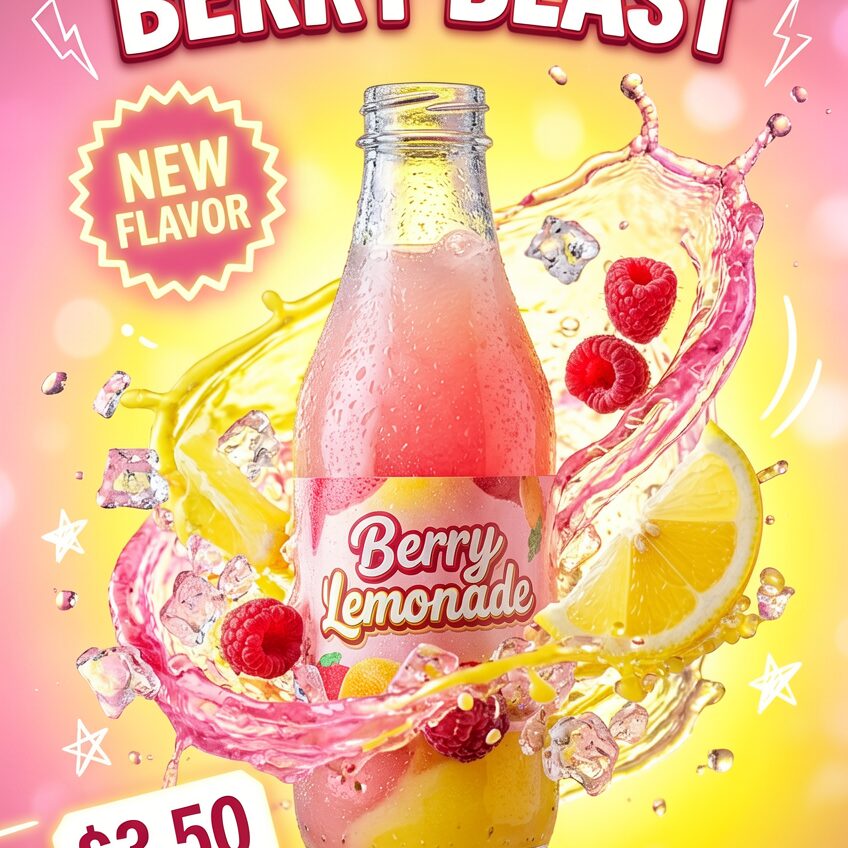
This is a vertical commercial promotional poster rendered in a high-speed commercial photography style. At the center of the image is a transparent glass bottle covered with condensation droplets, with the label “Berry Lemonade” printed on it and pink-and-yellow juice inside. Around the bottle, dynamic splashes of pink and yellow liquid swirl into a vortex effect, mixed with splashing ice cubes, fresh lemon wedges, and floating raspberries. The background features a bright pink-yellow gradient with soft bokeh highlights. At the top center, bold uppercase text reads “SUMMER REFRESH” and “BERRY BLAST.” On the left side is a glowing jagged starburst badge with the words “NEW FLAVOR” inside. At the bottom left is a striking price label showing “$3.50.” At the bottom center is a rounded rectangular button labeled “SHOP NOW.” White hand-drawn doodle stars and lightning accents are scattered around the edges of the composition. The whole image is lit like a bright studio setup, with backlighting that makes the liquid glow, and it has the sharp clarity of a 100mm macro lens with eye-catching text layout.
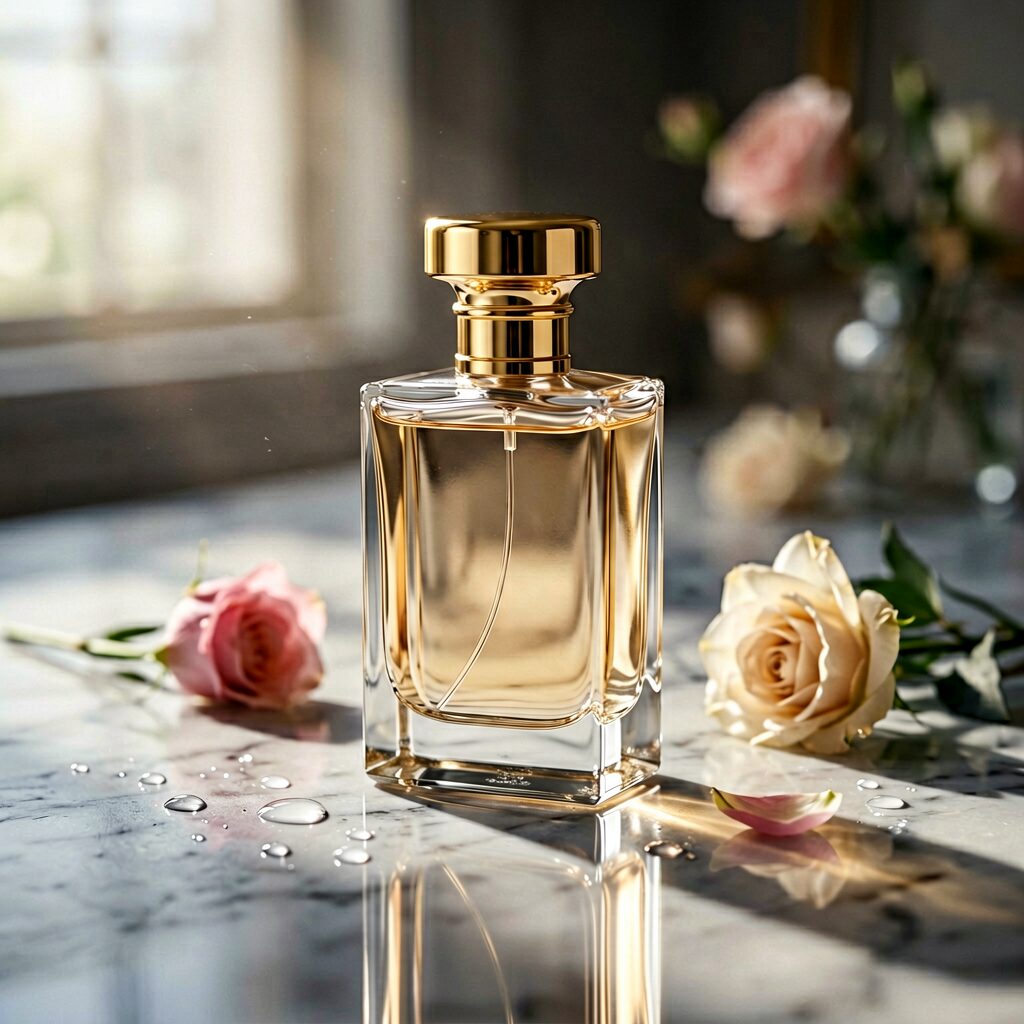
Luxury perfume product photography: an exquisite transparent glass perfume bottle with a gold cap placed on a smooth reflective marble surface, combining soft natural light with dramatic shadows. The style is high-end fashion advertising, with a minimalist composition and a clean, premium visual tone. Fresh flowers and water droplets decorate the scene, with shallow depth of field, blurred background, realistic lighting, ultra-realistic rendering, 8K resolution, cinematic texture, sharp focus, and a strong sense of brand identity.
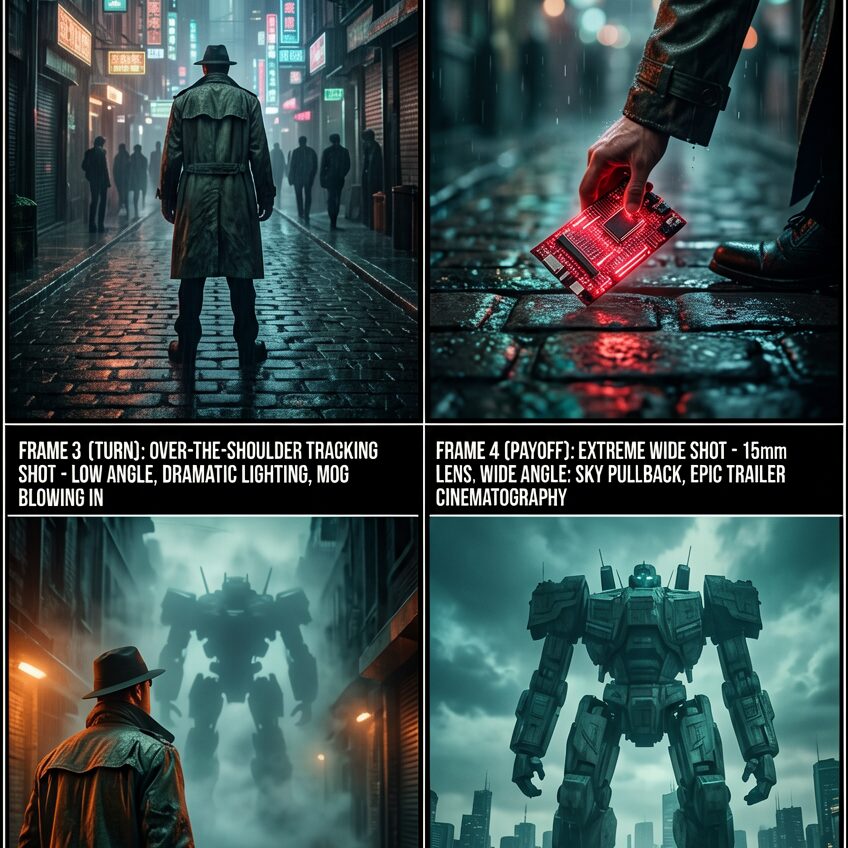
This is a four-panel cinematic storyboard image arranged in a two-by-two layout. It presents a cyberpunk-style suspense thriller scene. Each panel includes a black title bar and technical parameter notes.
The top-left panel is titled FRAME 1 (SETUP): WIDE ESTABLISHING SHOT - 24mm LENS, DEEP DOF, CONTEMPORARY NEON RIM LIGHTING. It shows a cyberpunk street on a rainy night, with tall buildings on both sides, covered in neon signs, and a wet reflective ground. A detective in a worn trench coat and hat stands in the middle of the alley with his back to the camera, while blurry pedestrian silhouettes appear in the distance.
The top-right panel is titled FRAME 2 (BUILD): MEDIUM CLOSE-UP - 50mm LENS, SHALLOW DOF, RAIN DROPLETS CREATE NATURAL BOKEH. It is a close-up of the detective’s hands as he searches the wet cobblestone ground for a glowing red cyber-deck. The raindrops and neon lights in the background form soft bokeh.
The bottom-left panel is titled FRAME 3 (TURN): OVER-THE-SHOULDER TRACKING SHOT - LOW ANGLE, DRAMATIC LIGHTING, MOG BLOWING IN. The shot is over the detective’s shoulder as he looks up toward the end of the alley, where a giant mech silhouette stands. Thick fog blows in from deep within the alley, and side lighting creates a dramatic atmosphere.
The bottom-right panel is titled FRAME 4 (PAYOFF): EXTREME WIDE SHOT - 15mm LENS, WIDE ANGLE, SKY PULLBACK, EPIC TRAILER CINEMATOGRAPHY. The camera pulls back to show how small the detective is in front of the enormous mech, which dominates most of the frame. The background features the city skyline and a gloomy sky. The overall color palette leans toward a cold cyan-and-orange contrast, with a classic neo-noir aesthetic.
A highly narrative vintage film-style photograph set in a worn semi-abandoned dwelling by a wilderness roadside. Indoors, an old golden table lamp casts a warm glow, while sunlight passes through the window grilles and projects orderly shadows across a weathered wooden table. On the table sits a realistically textured simple sandwich, alongside a brown paintbrush and a rusty old dumbbell. Hanging quietly on the window frame is an old talisman marked by time. Outside the window are ruined industrial walls covered with lush green ivy, clear and layered in tone. The image perfectly blends the heavy reddish-brown tones of Kodachrome 64 with the soft highlights of FUJI Astia 100F, producing rich but controlled color, extremely delicate silver-grain texture, and cinematic atmospheric clarity, creating an authentic yet melancholic nostalgic aesthetic.